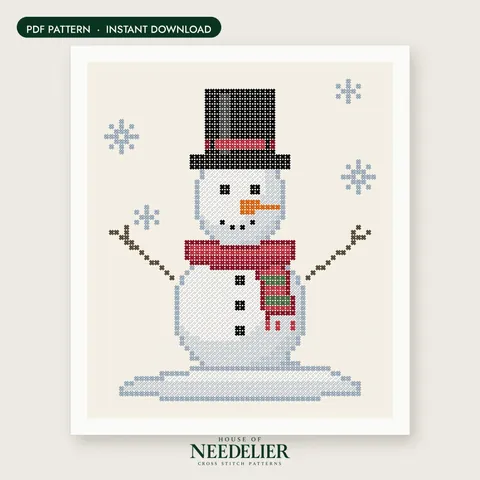
This tutorial follows one real design from start to finish: the Little Snowman, 54 × 64 stitches in 12 DMC colors, all full cross stitches (no backstitch, no fractional stitches). It is a good first project. Each step below has its own picture, so you can keep this page open next to your hoop.
Step 1: What you need
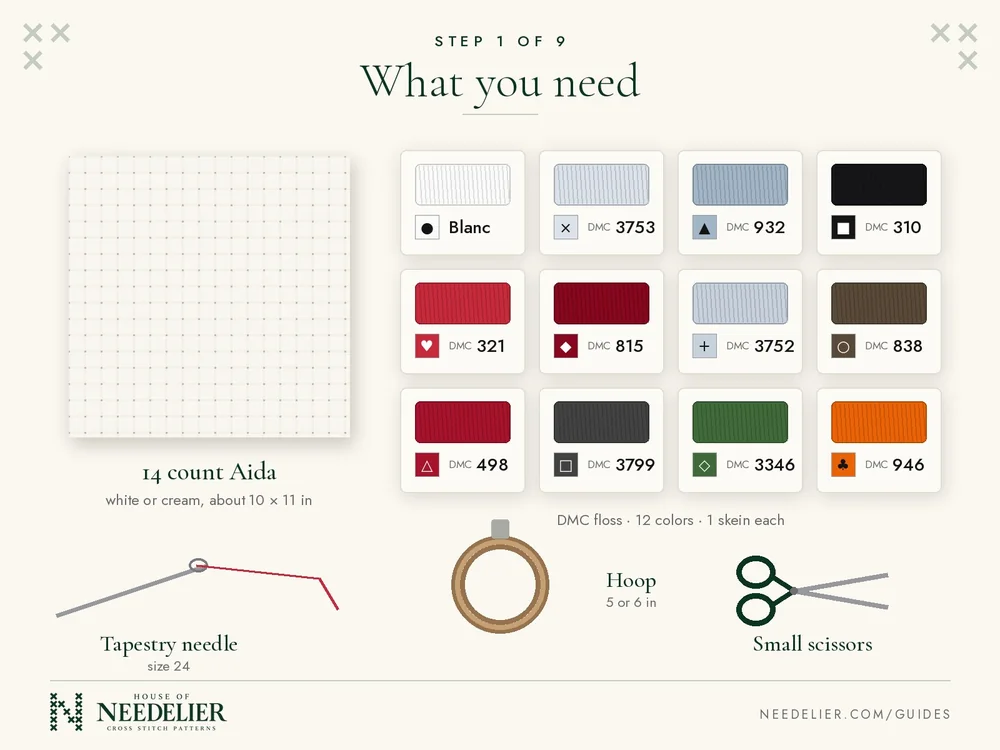
- Fabric: 14 count Aida in white or cream, about 10 × 11 inches (25 × 28 cm).
- Floss: one skein each of DMC Blanc, 3753, 932, 310, 321, 815, 3752, 838, 498, 3799, 3346 and 946. The design uses 1,441 stitches in total, so one skein of each color is plenty.
- Needle: a size 24 tapestry needle (blunt tip, large eye).
- Hoop: 5 or 6 in. The whole design fits in one hoop, so you never have to move it.
- Small scissors, and a printed copy of the chart (or a tablet).
The floss key in the PDF shows each color's symbol. The same symbols are on the floss cards in the picture.
New to the supplies? See Getting started with counted cross stitch and What size needle for cross stitch?.
Step 2: Cut your fabric
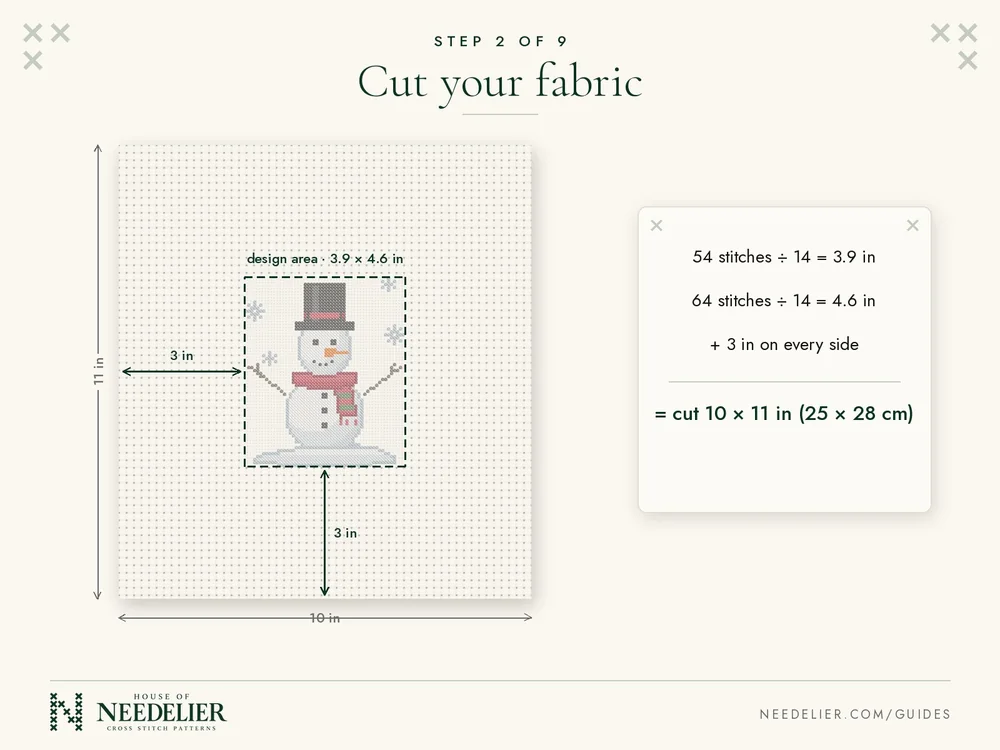
Divide the stitch count by the fabric count to get the finished size: 54 ÷ 14 = 3.9 in wide and 64 ÷ 14 = 4.6 in high. Add 3 in on every side for the hoop and for framing, then round up. That gives 10 × 11 inches (25 × 28 cm).
Stitching on 16 or 18 count instead? The finished size drops to 3.4 × 4.0 in or 3.0 × 3.6 in. The full method is in How much fabric do I need?.
Step 3: Find the center
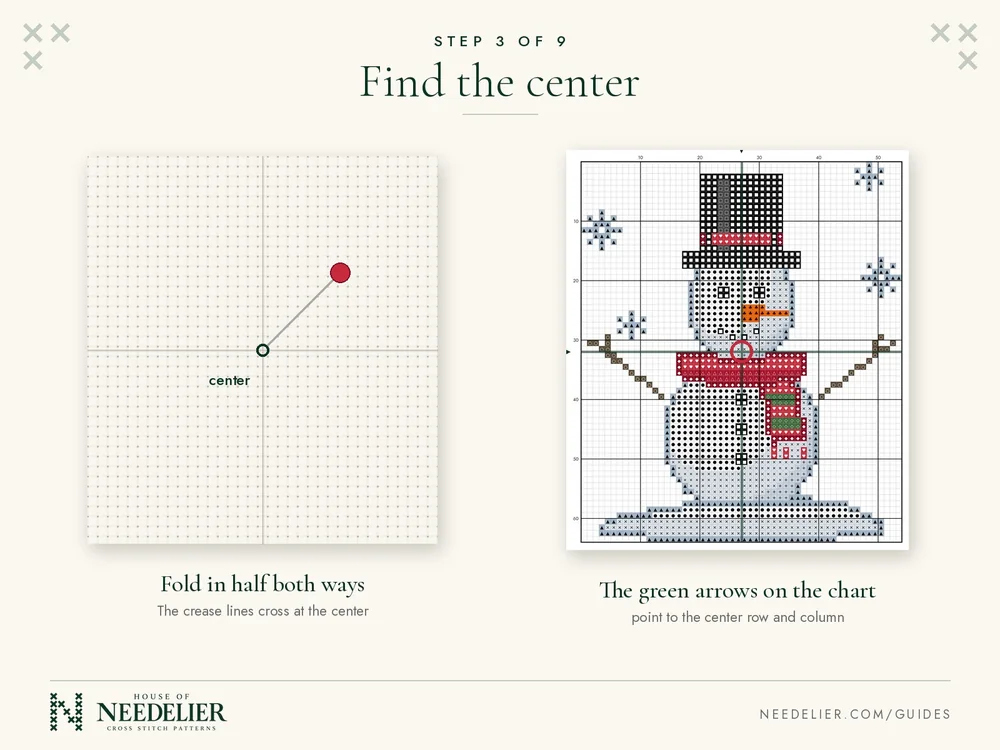
Fold the fabric in half lengthwise and then widthwise, and pinch the creases. The creases cross at the center, so mark it with a pin or a water-soluble pen.
On the chart, the small green arrows on the edges point to the center row and column. For the Little Snowman, the center falls on the snowman's neck, just above the scarf. You can start there, or count up from the center to the brim of the hat and begin with the hat (that is what we do in Step 7). Either way, count carefully in blocks of 10.
Step 4: Read the chart
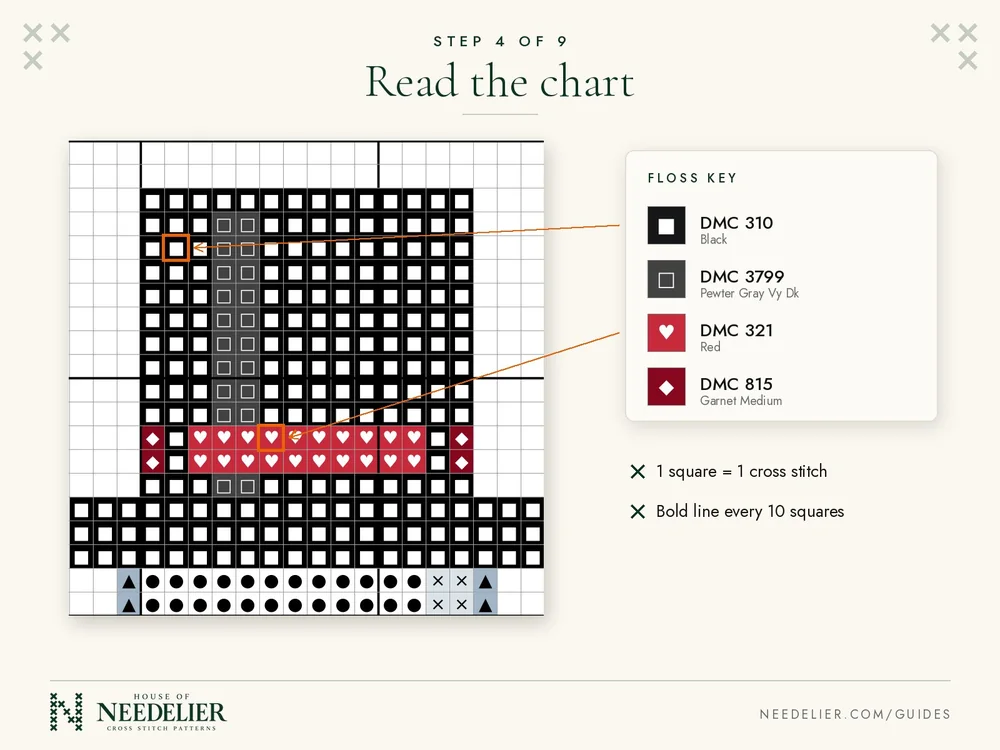
- One square = one full cross stitch. Empty squares stay unstitched.
- Each color has a symbol and a cell color. Look a symbol up in the floss key to find its DMC number. In the hat, the black squares with a white square symbol are DMC 310 Black, and the red squares with a heart are DMC 321 Red.
- A bold line every 10 squares makes counting easy. Row and column numbers are printed along the edges.
- Print the color chart for the screen, or the black-and-white symbol chart to save ink. Print at 100% ("Actual size"), not "fit to page".
More detail is in How to read our color and symbol charts.
Step 5: Start without a knot (the loop start)
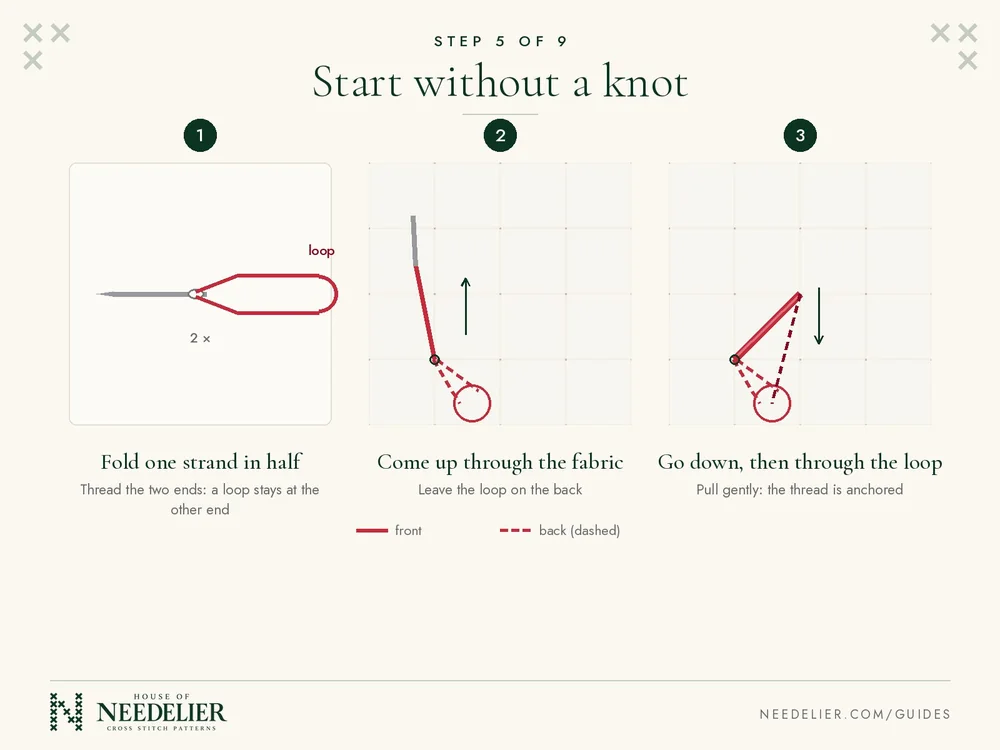
The Little Snowman uses 2 strands, which makes the loop start perfect:
- Cut about 32 in (80 cm) of floss and pull out one strand. Fold it in half and thread the two cut ends through the needle. The loop is at the other end.
- From the back, come up at the bottom-left corner of your first square. Stop while the loop is still on the back.
- Go down at the top-right corner. On the back, pass the needle through the loop and pull gently. The thread is anchored, and there is no knot.
Knots make lumps when the piece is framed. For other ways to start, see Starting and ending threads without knots.
Step 6: Make the X
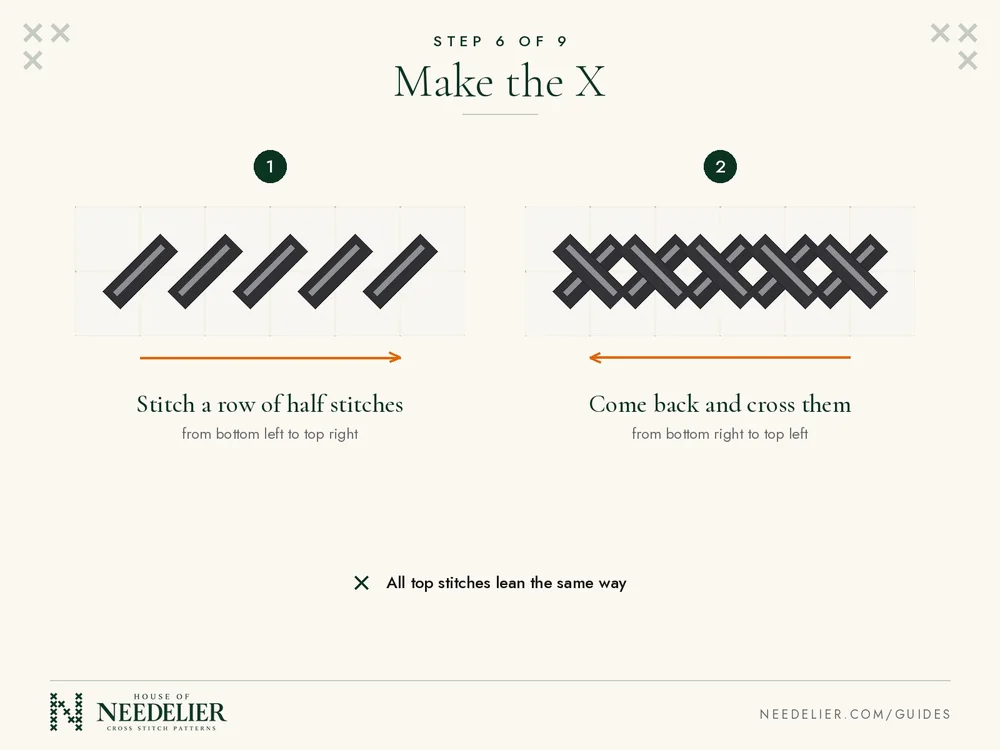
For a row of stitches in the same color (like the hat), work in two passes:
- Go: make a row of half stitches, each from the bottom left to the top right.
- Come back: cross each one from the bottom right to the top left.
The one rule that makes cross stitch look neat: every top stitch leans the same way. For a single stitch on its own (like a snowflake point or the snowman's mouth), make the whole X before you move on. See Full stitch, half stitch and backstitch.
Step 7: Stitch color by color
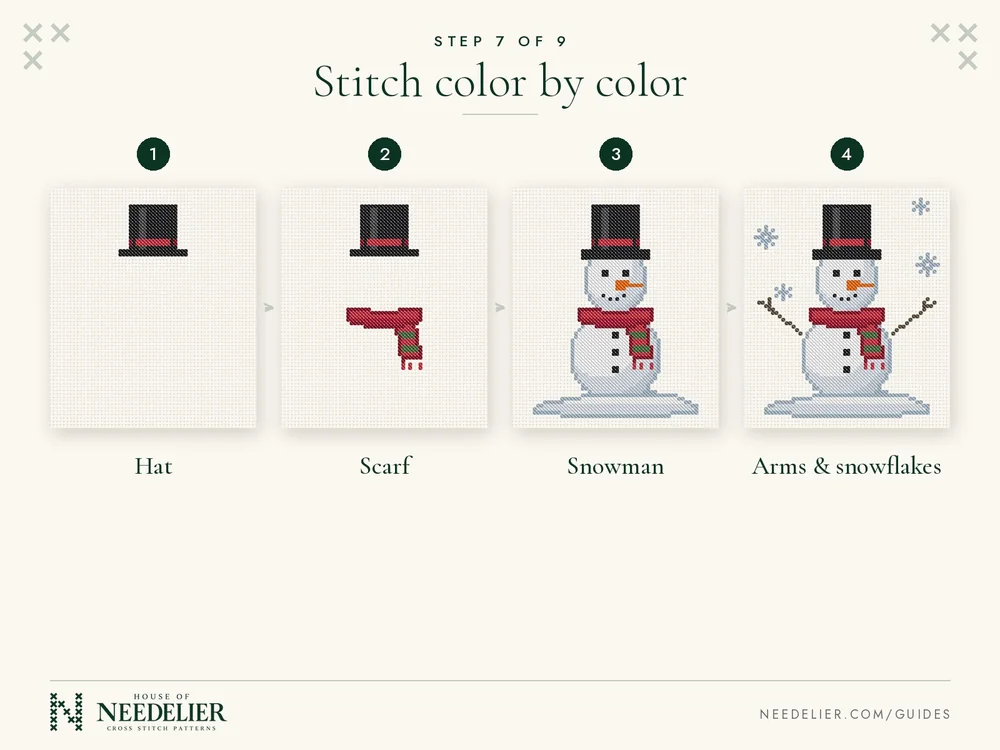
A good order for this design:
- Hat: black DMC 310 with the gray DMC 3799 stripe, then the red band in DMC 321 with DMC 815 at its ends.
- Scarf: DMC 321 and the darker DMC 815, the shadow row in DMC 498, and the green stripes in DMC 3346.
- Snowman: the white body in Blanc, the soft blue shading in 3753 and 3752, the outline and the snowy ground in 932, the eyes, mouth and buttons in 310, and the carrot nose in DMC 946.
- Arms and snowflakes: the twig arms in DMC 838, then the four snowflakes in 932.
Finish all the stitches of one color in an area before you start the next one. Don't carry dark thread more than about 3 squares across bare fabric on the back, because it shows through. End the thread and start again instead. Tick the "Done" box in the floss key as you finish each color.
Step 8: End your threads
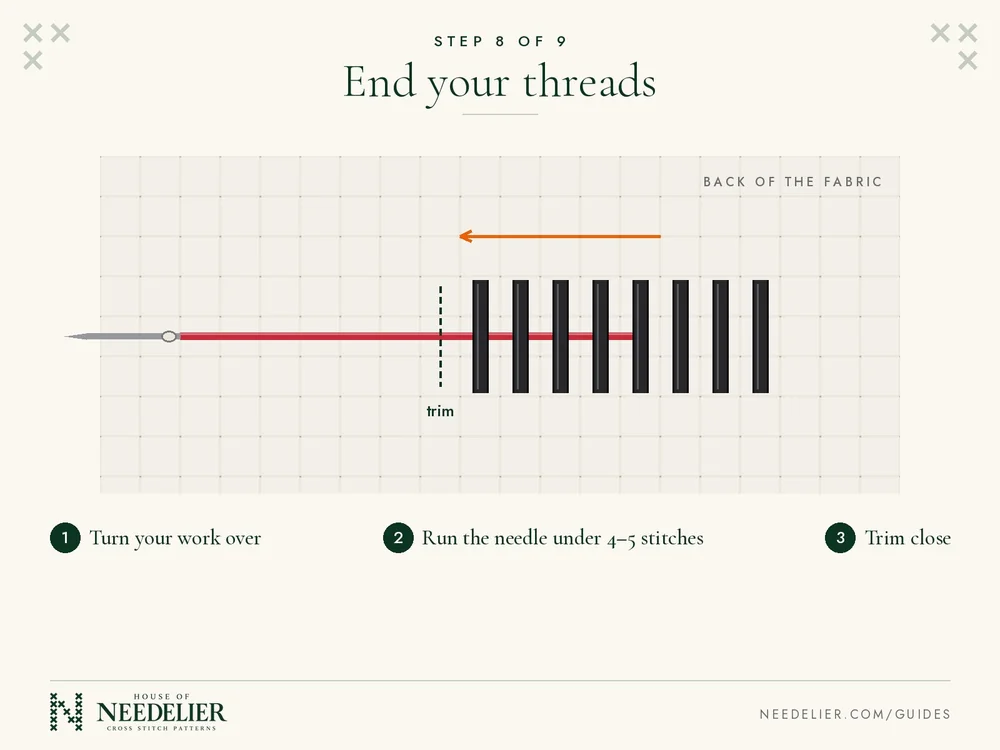
When about 3 in (7–8 cm) of thread is left, turn the work over. Run the needle under 4–5 stitches on the back, ideally in the same color, and trim close. Don't run dark threads under white stitches, because they can show through the snowman.
Step 9: Finish and frame
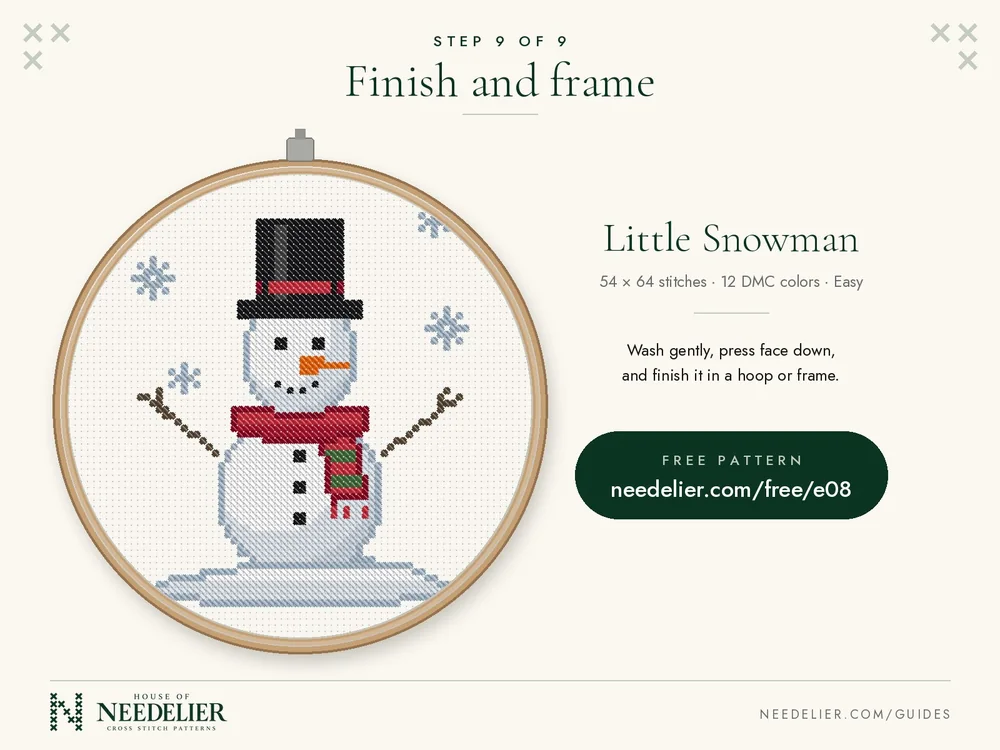
Hand wash the finished piece gently in cool water, roll it in a towel, and press it face down on a soft towel so the stitches stay raised. Then display it in a 5 to 6 in hoop, frame it, or turn it into a Christmas ornament. Step-by-step finishing is in Washing, pressing and framing and How to turn cross stitch into Christmas ornaments.
Next: Starting and ending threads without knots.
Frequently asked questions
How long does the Little Snowman take to stitch?
It has 1,441 stitches. Most beginners stitch about 100–150 an hour, so it takes roughly 10–15 hours, or a few relaxed evenings.
Can I stitch it on 16 or 18 count Aida?
Yes. Use the same chart and 2 strands, or 1–2 strands on 18 count. The finished size is 3.4 × 4.0 in on 16 count and 3.0 × 3.6 in on 18 count.
Do I need backstitch for this pattern?
No. The Little Snowman uses only full cross stitches, which is why it is a good first project.
Where do I start: the center or the top?
Find the center first so the design sits in the middle of the fabric. Then either start at the center or count up to the hat and start there.
What if I make a mistake?
Unpick the stitches with the needle or small scissors and stitch them again. See How to fix cross stitch mistakes.